
APCSCR Series Power SCR Controller Users Manual (Phase Angle)
SSR Intelligent Phase Angle Control Assemblies
-
Wiring Diagram (4-20mA, 0-5V, 0-10V Inputs)
-
Wiring Diagram (Potentiometer Input)
-
Wiring Diagram (0-135Ω Input)
-
Wiring Diagram (PWM Input)
-
Wiring Diagram (3 Phase 4 Wire Y Connection)
-
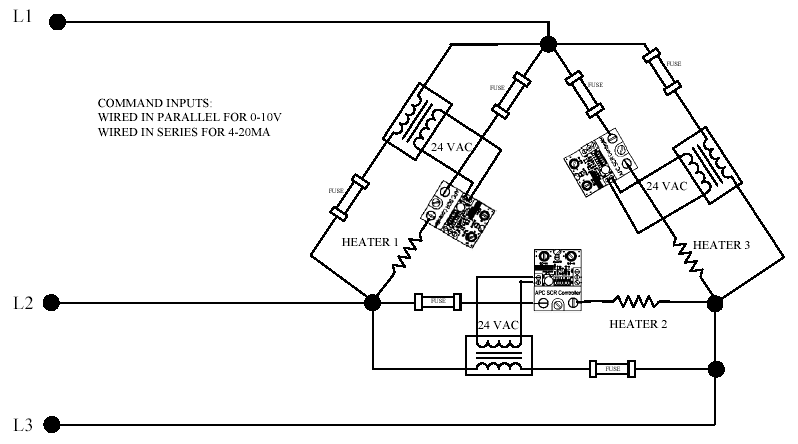
Wiring Diagram (3 Phase Inside Delta)

1 Ordering Code for Controller Cards
Power SCR Controller Assembly P/N
Description
Controller Card P/N
APCSCR25/40/50
APCSCR25/40/50 - VL
APCSCR25/40/50 - 135
APCSCR25/40/50 - PWM
SSR Mount Phase Angle Control Module, Volts, mA Input, Pot, Voltage Limit Option
SSR Mount Phase Angle Control Module, 0-135Ω Input
SSR Mount Phase Angle Control Module, PWM Input
2 Description
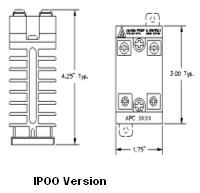
The APCSSRMAN-1P is a phase angle control module designed for use with standard footprint random fire SSRs (Solid State Relays). The module mounts directly on the SSR's input screws. The module operates by varying the firing point of the SSR's input. The power delivered to the load is proportional to the command input signal. The APCSSRMAN-1P series will not operate correctly with zero cross fired SSRs.
2.1 Features
-
Provides true linear power output phase angle control
-
Small (1.75" x 1.40") module mounts on the input terminals of an inexpensive SSR
-
Command input accepts 4-20mA, 0-10V, 0-5V, 0-135Ω, Pot, PWM
-
Configurable line voltage compensation increases stability of your process
-
Configurable soft start for high inrush loads
-
Automatic 50/60Hz operation
-
Adjustable Voltage Limit (-VL) Option
-
Drives multiple solid state relays
-
Single phase and three phase control
3 Installation

WARNING: FIRE HAZARD!! Even quality electronic components CAN FAIL KEEPING FULL POWER ON! Provide a SEPARATE (redundant) OVER TEMPERATURE SHUTDOWN DEVICE to switch the power off if safe temperatures are exceeded.

WARNING: HIGH VOLTAGE!! This control is installed on a Solid State Relay with high voltage on it. This control must be installed in a GROUNDED enclosure by a qualified electrician in accordance with applicable local and national codes including NEC and other applicable codes. Provide a safety interlock on the door to remove power before gaining access to the device.
3.1 Mounting Instructions
The APCSSRMAN-1P is mounted directly to the control input terminals of an application specific SSR. Some relays have short input screws and longer screws will required to reach through the contacts on the APCSSRMAN-1P. Be sure to observe the correct polarity when mounting the module (module should be positioned over the SSR). The module should sit firmly on top of the SSR when the screws are tightened.
3.2 Electrical Connections
See the WIRING DIAGRAMS. Make sure the module ordered is the correct module for the application before wiring.
Before wiring the module all Dip Switch settings for the command input and special features should be setup properly per section 4.6.
4 Operation
4.0 Power Supply
The APCMAN1P power requirement is 24V AC +/-15% 47-63Hz. The module will not
operate from a 24VDC power supply since it relies on the 24VAC supply for
synchronization to the AC line. The 24VAC power input integrity is critical to the proper
operation of the APCMAN1P. Noise or distortion of this power will affect the zero cross
timing and thus accuracy of the output, especially in three phase applications. Using a split
bobbin transformer for the 24VAC supply is recommended.
4.1 Command Input
The APCSCR25/40/50 SCR Power Controller can accept 4-20mA, 0-10V, 0-5V, and Potentiometer and PWM inputs.
The APCSCR25/40/50 135 can only accept 0-135Ω inputs and the APCSCR25/40/50 PWM can only accept PWM inputs.
All command inputs are not isolated from the 24VAC power Input. If more than one APCSCR-1P is to be used from the same drive signal, separate power transformers are required. The type of command input can be configured via the dipswitch. The default setting is 0-5V/potentiometer.
4.2 PWM Command Input
The PWM drive signal used to control the APCSCR25/40/50 can range from 5-30VDC (peak). Best performance will be obtained when using a TBD.
TBD logic range TBD open Collector drive, etc.
4.2.1 Input Fail-Safe Protection
If the signal sent to the APCSCR-1P's command input should become electrically open the control output will be forced to an off state.
4.3 Line Voltage Compensation
The APCSCR25/40/50-1P's line voltage compensation keeps the power constant on the load as the line voltage changes. The line voltage is measured via the 24VAC power applied to the APCSCR25/40/50-1P module. To use the line voltage compensation feature properly, the 24VAC power transformer should be fed from the same mains as the load circuit to be controlled as per the wiring diagrams at the end of this document. Line voltage compensation can be set on or off using the configuration dipswitch. The default setting is on. To set the Line Voltage Compensation to OFF, set switch # 6 to the ON position.
4.4 Soft Start
The soft start feature ramps up to the command value over a period of approximately 20 seconds. The soft start time resets if the command value goes to zero (less than 4% of the input range) or power is cycled. Soft start is useful on high inrush heaters such as Quartz, Molybdenum, Tungsten, or Graphite heaters. Soft Start can be set on or off using the configuration dipswitch. The default setting is off.
4.5 Voltage Limit
The Voltage Limit option is only available to the APCSCR25/40/50-1P. It can be ordered as APCSCR-1P-VL. The Voltage Limit feature is used in conjunction with the line voltage compensation feature to limit the actual voltage delivered to the load. The voltage limit is adjustable via a potentiometer located just below the input terminal block. For this feature to work correctly, line voltage compensation must be turned on and the power transformer for the APCSCR25/40/50-1P must be connected to the same mains as the load power is connected to.
4.5.1 Voltage Limit Adjustment Procedure
The Voltage Limit is adjustable from 5% to 100% of the max load voltage. Setting the Voltage Limit potentiometer half way corresponds to a power limit of approximately 55% or a voltage limit of 70% of the max load voltage. The best way to set the voltage limit is using a voltmeter connected across the load. With the command input set to approximately 100% (on startup) turn the pot fully CCW. Then just turn the pot CW until the desired output voltage is achieved. For this feature to work as a true voltage limit, it is important that the Line Voltage Compensation switch be set to ON (this is the OFF position of switch # 6).
If the line voltage compensation is set to OFF the voltage limit will act as a
percentage of output limit and the absolute voltage limit will change with line voltage
4.6 Configuration Dipswitch
The configuration dipswitch is used for setting up the command input, line voltage compensation and soft. Using a pen point gently push the switch up for on and down for off according to the setup outlined in the table below.
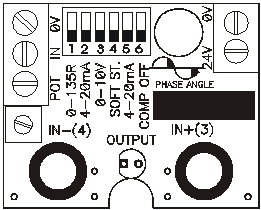
COMMAND INPUT
1
2
3
5
0-5V (Default)
Potentiometer
Off
Off
Off
Off
0-10V
4-20mA
1-5V
2-10V
0-135Ω*
PWM**
*Module must be ordered as APCSCR25/40/50-1P-135 for 0-135Ω input support.
**Module must be ordered as APCSCR25/40/50-1P-PWM for PWM input support.
FEATURE ENABLE
4
6
Line Voltage Comp Enable (Default)
None
Off
Off
Soft Start Only
Soft Start & Line Voltage Comp Enabled
Contact Anacon Power & Controls for applications assistance - 800-466-9080.
Off
Off
On
On
On
On
On
Off
Off
Off
Off
Off
Off
On
Off
Off
Off
Off
Off
Off
On
On
Off
Off
Off
Off
Off
On
On
On
Off
Off
Off
Off
4.7 Control Output
The APCSCR-1P SSR output drive is a DC pulsed current limited 10V/15mA (nominal) drive signal. This is more than enough current for driving most 3-32V standard SSRs, however it is still important to review the data sheet for the SSR you would like to use for compatibility with the APCSCR25/40/50-1P's output drive. The following graph will allow you to verify the SSR's compatibility with the APCSCR25/40/50-1P over wide input voltage variations.
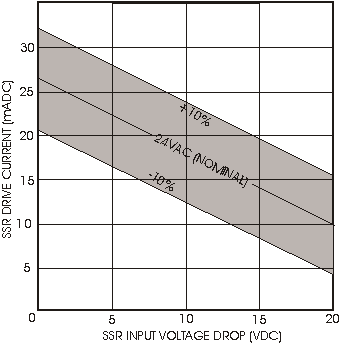
APCSCR25/40/50-1P Output Drive Current vs.
SSR Input Voltage Drop
4.8 Output LED
The APCSCR25/40/50-1P's RED output LED will turn on when the output is on and increase in intensity as the power output is increased. Because the drive signal varies considerably to give linear power output, the LED should only be used as a rough indication of SSR Drive and not actual power output. The output LED is wired in series with the SSR's input. If there is a poor connection on the SSR input terminals or a problem with the SSR's Input, the output LED will not become energized.
4.9 Three Phase Operation
Two APCSCR25/40/50-1Ps can be used to control two poles of a three phase load.
Three APCSCR25/40/50-1Ps can be used to control three poles of a three phase load. The Module should be wired as shown in the wiring diagrams, using one transformer per each leg to be controlled.
4.9.1 Three Phase Special Wiring Considerations
The APCSCR25/40/50-1P derives its AC synchronization from the applied 24VAC power. Each 24VAC transformer's primary must be connected to the corresponding leg power to be controlled by each APCSCR25/40/50-1P.
4.9.2 Three Phase Wiring of Command Inputs
The command inputs should be connected in parallel if 0-5V or 0-10V is selected and in series if 4-20mA is selected.
5 Electrical Specifications
Command Inputs
Input Impedance
4-20mA, 0-10V, 0-5V, 0-135Ω, Pot, PWM
0-135Ω Excitation Current
10K Ω (0-10V), 250Ω (4-20mA), 100K Ω (0-5V)
Control Output
Response Time
PWM Input Period Range
Output Linearity
13mA max
SSR Drive, DC pulse, nominally 10V at 15mA
50mS
1-5 seconds
+/-2%
External Potentiometer Res.
Line Voltage Comp. Range
Regulation
Soft Start Period
Voltage Limit Range
Ambient Temperature Range
Power Supply
Line Frequency Range
1K Ω-25K Ω
+15%/-15% up to 100% output
2%
20 Seconds to reach 100% output
5-100% of max load voltage
0 to 70 °C
24VAC +15/-15%, Power consumption less than 2 Watts
47-63 Hz
6 Mechanical Dimensions
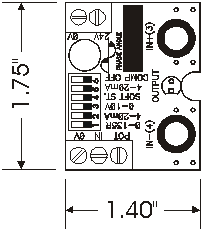
APCSSRMAN-1P Max Height is 0.6"
Assembly is .6" higher with Controller Card on top.
7 Contact Information
Anacon Power & Controls
800-466-9080
www.anaconpower.com
8 Wiring Diagram (4-20mA, 0-5V, 0-10V Inputs)

9 Wiring Diagram (Potentiometer Input)

10 Wiring Diagram (0-135Ω Input)

11 Wiring Diagram (PWM Input)

12 Wiring Diagram (3 Phase 4 Wire Y Connection)

13 Wiring Diagram (3 Phase Inside Delta)
Address
Anacon Power & Controls
100 Powder Mill Rd. Suite 162
Acton, MA 01720
Phone
TEL: 800-466-9080
TEL: 978-287-0715